


All Products
-
 Bruno NascimentoThank you for your continued help and support in providing us with high-quality and affordable products.
 -
 Ehsan SalmariPrompt reply and professional attitude make our cooperation smoother!
GE Mark V Series Drive Control Card with 200mm Height 100mm Width and 1 Year Warranty for Turbine Control Systems


| Place of Origin | USA |
|---|---|
| Brand Name | GE |
| Certification | COO |
| Model Number | DS215GASCG4AZZ01A(DS200SDCCG4AEC+DS200SLCCG3ACC) |
| Minimum Order Quantity | 1 |
| Price | $1500 |
| Delivery Time | 5-7days |
| Payment Terms | T/T |
| Supply Ability | 999 |
Product Details
| Name | GE DS215GASCG4AZZ01A(DS200SDCCG4AEC+DS200SLCCG3ACC) Drive Control Card | Product ID | DS215GASCG4AZZ01A(DS200SDCCG4AEC+DS200SLCCG3ACC) |
|---|---|---|---|
| Series | Mark V | Product Net Weight | 2kg |
| Product Net Depth/Length | 330mm | Product Net Height | 200mm |
| Product Net Width | 100mm | Warranty | 1 Year |
| Highlight | 200mm Height Drive Control Card,100mm Width Drive Control Board,1 Year Warranty Turbine Control Card |
||
Product Description
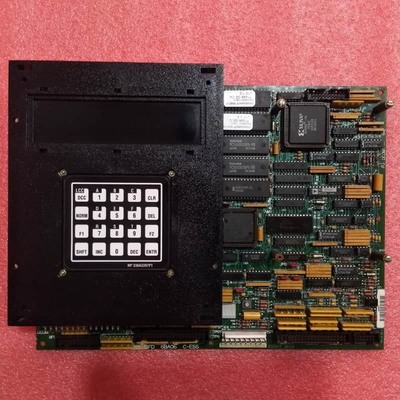
GE DS215GASCG4AZZ01A(DS200SDCCG4AEC+DS200SLCCG3ACC) Drive Control Card
Product Overview
The GE DS215GASCG4AZZ01A(DS200SDCCG4AEC+DS200SLCCG3ACC) is a core Drive Control Board designed for industrial drive systems, likely integrated with GE's Mark V Turbine Control System. This advanced control card features three specialized microprocessors:
- Drive Control Processor (DCP): Manages system-level tasks including chip select decoding, direct memory access (DMA), and interrupt control
- Motor Control Processor (MCP): Handles motor-specific functions
- Co-Motor Processor (CMP): Processes math-intensive tasks beyond the MCP's capability
Key Features
- Expandable Functionality: Supports optional LAN and signal processor cards for diverse communication and signal processing needs
- Intuitive Diagnostics: 10-LED front panel with BCD/binary fault coding enables quick issue identification
- Configurable Hardware: Factory-set JP/WJ jumpers ensure compatibility with flexibility for user adjustments
- Robust Design: Shared RAM allows simultaneous multi-processor access for efficient operation
- Secure Installation: Includes standoffs, nylon washer compatibility, and EPROM transfer guidelines
Installation & Maintenance
For safe installation/replacement:
- Disconnect all power sources before installation to prevent electrocution
- Remove cables from auxiliary cards and securing screws before board removal
- Transfer EPROM modules from defective board to replacement unit
- Use factory nylon washers to prevent screw damage during reassembly
- Ensure plastic holders are properly tightened
Note: All specifications and features are subject to change without notice. Always refer to the manufacturer's documentation for the most current information.
Recommended Products